Taking ‘professional’ quality photos of room interiors has gotten much easier since the advent of digital photography. One of the nice things about using online photography resources is the amount of information that is available to help you learn about taking good digital pictures.
In days of old, you assumed that to get good interior photography shots you needed a van load of lighting equipment and all the associated paraphernalia to properly light a room and get good quality photos. Now, with the ability to receive instant feedback from your camera, you can make shots that would have been difficult to take with film in the past.Recently I was visiting a friend who is a professional kitchen designer. He mentioned that he had just completed a nice kitchen project that turned out very well. He said he would have liked to submit photos of the job to his local association’s design contest but the submission deadline was only a few days away and he didn’t have time to have the photos professionally shot.
Of course when I heard that I immediately said “I’ve got my camera with me. Let’s run over and give it a go!”
(In the future I will have to remember to look before I leap.)
We arrived at the home in the middle of an extremely hot and bright June day. And the kitchen had a large southern facing window above the sink that did not have any type of blinds. One part of the room was as bright as a supernova and the other corners seemed terribly dark by comparison.
I spent quite a bit of time trying to get some decent shots thinking that I could use my flash to ‘over power’ the sun. But a SpeedLite is no match for midday sunlight.
Finally I decided to try something different. We found a few pieces of cardboard and blocked the window as best we could. Then we turned on all the room lights to their highest settings. I mounted the camera on my tripod and took a number of shots at low ISO and an F11 stop without using the flash.
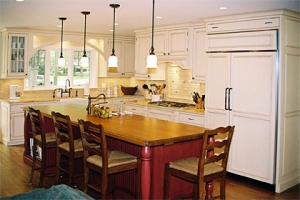
While the results would probably make a pro laugh, I was fairly amazed at how the photos turned out. The shot above (click on the picture for a larger view) was shot at a setting of 15 seconds at F11, ISO 100. The bright kitchen window is just off to the right. And even though it looks like you see the regular sun reflected in the range hood, this was just the amount of bright sun that sneaked by the edges of the cardboard during that long exposure.
So here’s a way to manipulate lighting without carrying around a ton of lighting equipment. Instead of trying to add light to even things out, take it away and use a longer exposure. If I would have had more time that day, I can see now how I could have adjusted the lighting for any part of the interior shot by ‘taking away’ light.
If you have to do an interior photography shot ‘on the spur of the moment’, use whatever you have a available to block light that is too bright to even out your light sources and you’ll come away with a nice result. Don’t worry about how dark it gets. The camera doesn’t care and it’s just a matter of taking a longer exposure. In my opinion, the cost for roll of masking tape and some cardboard sure beats the price of big set of lighting gear. And it’s a lot easier to carry around!

Leave a Comment